Thursday 28 February 2013

Crafty Time

Hello everyone, well I have had a very busy week and not had five minutes to myself to do my next challenge piece, I have my dad very ill and father in law just out of hospital from a major operation, so as you can imagine its been one of those weeks.

Anyway I finally got around to some time to myself to do my next challenge piece
This is for Delicious Doodles 

So here is my entry 


I have used rose and butterfly frame from delicious doodles. I started off by adding a sentiment to the centre of the digi image, I then printed one copy with the sentiment and another without.
After I then coloured the whole image in using Promarkers, the colours I used are for the Rose - Berry Red and Poppy
Leaves - Emerald and Grass
Rose Buds - Hot Pink
Frame - Gold
Butterfly - Cool Aqua, Purple and Cerise
Once the first image was coloured I then picked out which parts on the second image without the sentiment I wanted to colour, So I coloured the leaves,rose buds and the butterfly. I then cut out the first image and the parts I wanted off the second image.
Now I choose my background paper and card to go onto the blank 8X8 card, I trimmed these down to size, once these were trimmed to size I then placed my design together and moved a few things around once I was happy with it I then glued everything down. I placed 3d foam pads on the back of my extra leaves rose buds and butterfly wings, these were then places into position and stuck to give them a 3d look.
Lastly i added some mulberry paper roses to the flourish's and diamante's to the swirls and leaves on the flourish's.
I would also like to enter this card into the following challenges

Kelly xxx

Wednesday 20 February 2013

Crafty Goings On

Hello all, well my goodies arrived this morning YAY!! so I had some happy post lol
Well today has been a little hectic with sorting a few things out for a paranormal investigation team I am apart of, then I had the pooch and kitty to see too and helped a friend out as much as I could, So after all this was done it was time to play wahoooo!!

Well I went through my goodies and wish I hadn't as there was so many I wanted to do and could not choose in the end I finally decided and away I was.

So here is what I have made today
Tealight Candle/Chocolate Gift Box Card

Front Of The Box Card

Inside the box card


Now for the hard part :), I made this from my goodies that arrived today, I had two discs full of templates and this was one of them so, I printed off the parts I needed onto thin card first, cut them all out and then drew around them on much sturdier card and again cut all parts out,(had to do it the long way due to my printer wont take thick card grrrr!!) I then followed the instructions and made score lines where I needed to and then folded where I needed too, once all this was done I began decorating, the first part I decorated was the gift box itself, I used border peel off stickers to decorate the edges, now this was done I could build it up and stick it all together. 
While the gift box was drying I concentrated on decorating the front of the card,I used a 3d Fuzzy Moon decoupage layered it all up using 3D Foam pads, after I took some lovely glitter cadbury purple ribbon, and wrapped it all the way around the front of the card and the inside, I then cut the ribbon to where I needed too. I then got my double sided sticky tape roller and went from one side to the other, then put the ribbon on I did the same again for the inside of the front of the card, at the same time as attaching the ribbon I placed two feathers in place.
After this again I took my ribbon and went all the way around the card, so it made a cross on the front of the card I made sure enough was left over so it could be tied. Now all the ribbon was in place I added my Fizzy Moon decoupage image in the centre so that both feathers just popped out each side of the image. Then I took some of my mulberry paper roses and stuck these down along with a tatty teddy Just For You Tag.
Now the inside was missing something so I added a sentiment in the middle of the ribbon which says Happy Birthday

Lastly all I needed to do was attach the gift box inside, so I used my double sided tape down the edge of the box and on the base, positioned it and stuck it all down

These will be the perfect little gift for any occasion especially Mothers Day, I have left the gift box empty for now but have made sure customers know they can have a choice of either Tealight candles placed in or a few chocolates 

Kelly xxx

Monday 18 February 2013

Working away

Afternoon all, well I have been a little busy with some orders for a friend, plus went to a 
pole-fit taster class last night with my cousin, and oh boy do I ache today, so I am taking things a little easier today as when I move all you hear is ooo eee ahhh ouch lol.

Well the order I am busy working on is Spiderman vs Darth Maul, her little lads love them well one is Spiderman one is Darth Maul, and they are having a joint party and my friend asked me to make their cards for her and party invitations so thats what I am busy doing atm, once they are all complete I will be blogging all about them and showing you all.

Now I made a lovely card for a friend as a surprise as her Birthday is on 19th Feb only a few days before mine and I just wanted to surprise her so here is what i come up with for her, as she makes fimo clay dragons etc hehe


The image has all been hand coloured with my promarkers, the colours i have used are orchid,purple,azure,berry red,satin,tan,blush,putty,warm grey 1& 3, grass,magenta,tulip yellow,pumpkin. The backing card is a glittered black card then on top of that is a pink glittered card and then the image I also added two pink feathers, a sentiment at the bottom with a mulberry paper rose each side a lovely 3D butterfly and a fabric flower.

I found designing this one very easy because of what I used as the image and I knew she would like it, so once it was all dry I put a little birthday message on the inside, and got it all ready to be posted along with a necklace I also made for her.


My friend received these the other day and was itching to see what I had sent to her, so I let her open them early due to she was itching to open it and I was itching to see what she thought and her reaction to them was - I LOVE THEM <<< by this time I sighed with relief and had a very big smile on my face, to which my friend also had a big smile on her face YAY

Just to have comments like that from work I do makes it all the more worth while 
I love love love doing what I do 
Kelly xxx

Friday 15 February 2013

Feeling Crafty

Hi all, well after the last challenge the other week at delicious doodles and enjoying it so much, and being spotlighted on there for the card I did, I am now having a go of the NEW Challenge that is running 

The challenge this week at Delicious Doodles 

So this time it is something for the boys, at first I struggled to come up with something but after a while of thinking of what images I could use and designing in my head, I decided to go for a Pirate Theme card for the challenge and here it is 

Arrrrrr!!! Jim Lad

The images I chose are Pirate Polly and the Treasure Map, I also decided to use the Rose & Thistle Papers.
I took the images I wanted to use and printed them off along with the backing papers and the sentiments, once this was all printed I started to colour in Pirate Polly with my promarkers. I used Magenta on her hat and trousers  Purple, Amethyst and Warm Grey 3 on the underside of her wrap around, Berry Red Poppy and Warm Grey 3 on the outer layer of her wrap around, Tulip Yellow and Gold on the belt, Warm grey 1 and 3 on her boots, Azure and Sky Blue on her top, Emerald for the eyes, Cerise for the lips,Blush Putty and Oatmeal for the skin and for her hair I used Cocoa and Burnt Umber.
Now Pirate Polly was all done, I cut her out and the treasure map firstly i crumpled up the treasure map and then used Tim Holtz Tea Stain Distress Ink and the same on the sentiments once I had cut them out.
Now to put it all together I firstly got a blank 8x8 card and some black glitter card measured it to the right size and glued it into position, I then cut the first layer of backing paper to the size I required and again glued this down, and the same with the top layer of backing paper.
I then stuck 3d foam pads to the map and stuck that into position after playing around for a while of where to put it, I did the same thing with Pirate Polly used 3d foam pads and stuck her into place, After I put the bottom sentiment into place again using 3d foam pads and the same with the top sentiment.
To finish the card off I stuck some diamante's in the corners of the backing paper and in the corners of the top sentiment

I would like to enter this card into the following challenges also
Raise The Bar - Anything Goes


Delicious Doddles DT Entry

Hello all, today this post is to show some of my favourite makes which I would like to show you all for my entry to join the Design Team at Delicious Doodles 

I have a variety of different styles, I also don't just do Cards I love making different things papercraft related from wedding stationery to gift boxes and 3D Keepsakes. I have been crafting for over 2 years now I first started making jewellery and then changed to Card Making etc, and have never looked backed I absolutely adore making Cards,Wedding Stationery Keepsakes and so on.

I have a few of Delicious Doodles digi stamps and have to say they are my most favourite range of digi stamps, Teri's creations are stunning and if I could get away with it with out the better half knowing I would buy every single image, The reason I love using these images is because they are so easy to colour with my Promarkers and give me great inspiration for layouts for cards etc, some nights i can even sit there and just colour a certain image over and over in different ways and they look brilliant done all different colour ranges, the digi's really do give the cards etc the WOW!! factor. Everytime a new image is launched I sit back and think WOW!! I know exactly how i could colour that and what to use it for.

Now for my Three Images I have decided not to show any with Delicious Doodles Digi Stamps as i wanted to show you all the different styles I enjoy doing

My first image is a card I made for a friend


My second is a gift box I made and decorated


My Last image is the bookatrix cards I do this one I made for myself it is a memorial bookatrix I made in memory of my Grandad (who is my inspiration for the majority of my cards etc)

You can also see a lot more of my different creations on my Facebook page

Thursday 14 February 2013

Love is in the air

Hello all, today I created a stunning Valentines Day card, after getting home from a very hectic day in town in the horrible cold weather we have had snow once again, luckily it has gone though due to having rain afterwards. I did treat myself while out today to a lovely heart border punch which I just couldn't wait to use, so I have used it on this creation 

Here is the card I have made today 

I started off with a blank A4 card, and all my goodies that were along the valentines theme, so I firstly played around with the design, once I was happy with it I then put it all together properly on the A4 card.
Firstly I used my X-Cut Hearts border punch on the red glitter card, I then got my gold glitter card and stuck this down onto the A4 card after making sure it was the right size, a little had to be cut off but not much at all, after I stuck my red glitter card on top
After doing this I then got my valentine papers I had chosen and used my border punch on them to round off the edges, I then took my first sheet arranged it how I wanted it to go, then glued this down, I did the same for the other two sheets.
Now I had my backing cards and papers in position and stuck down, Now I moved onto the image, I stuck some square tabs on to the back of it and positioned as required, once I was happy with it I then chose a sentiment to go at the top again put square tabs onto the back of it and stuck it into position, and then i decided to add two red feathers to either side of the image.
Lastly all that was needed was a little sparkle, so I then put a diamanté into each corner of the image and three lovely glitter hearts in the corner of the top valentine paper going down the card.

I would like to enter this card into the following Challenges 
Feeling The love - Love To Create 
Sent With Love - Digi Sketch Challenge
My Valentine - Craft Your Passion
My Hearts all a flutter - Tuesday Alchemy
Valentine anything goes - Celebrate The Occasion
Be My Valentine - Digi Darla's 

Monday 11 February 2013

A bit of me time

Well yesterday I had a bit of me time to do some new things well the first thing I wanted to do was make some gift boxes and decorate them. Now the one I have done I actually made up a few months back as it was part of a 3d keepsake, but I never got around to finishing it so I decided to just decorate the box up. The box was actually the base for a 3d keepsake, so the templates for this I purchased from CraftsuPrint.

I am actually really pleased on how different the box looked after I had finished decorating it

The lid of the Gift Box

Side view of the Gift Box

Another view of the Gift Box

I first started by making the rose for the centre of the lid, I made this rose by using the Spellbinders Rose Creation die cut and my Bigshot, I chose the colours I wanted and the sizes of the die cuts, I then cut them all out and built the rose up, once it was all built up I then curled the edges over to make it look mare realistic  after I added glitter to the edges of the petals. Next I used some border peel off stickers around the edges of the lid, and on the sides of the lids, once this was done I then used Papermania Capsule Collection pink flowers around the side of the lid. After sticking all the flowers down, I then used some die cut vine swirls that I had given to me and positioned these in place and then glued them, once these were glued into position I then stuck down the rose in the centre.

Once the rose was in place and the vine swirls, I added some diamantes onto the leaves, then added two mulberry paper roses which i purchased from Wild Orchid Crafts i put one on each vine, finally on the lid i added a Martha Stewart Punch Butterfly to give the lid that finishing touch.

Now the base, I added some lovely pink satin ribbon all the way around. then I place the lid back on and there we have it, very easy and very effective. 
In the coming weeks I am going to do a few more of these hopefully in different sizes, different colours and decorated differently
The one above measure roughly
Width - 16 cm
Height 8 cm

I really enjoyed making this and can't wait to do more :) 


Saturday 9 February 2013

Crafty Goings On


Hi all well I have had a bit of me time and decided to have a go at a challenge run
 by Delicious Doodles called No Patterned Paper.

This is my first ever challenge and I'm really proud of what I have come up with so here goes

This is my entry which I have called Butterfly Wishes for Delicious Doodles Challenge
 No Patterned Paper


The image I used is one of Delicious Doodles called Fairy Fae, I have coloured her in with promarkers, the colours i have used are vanilla,blush,emerald green.amethyst,cinnamon,baby pink, maroon and grass.

When I finished colouring her in I then cut her out and used my corner punch to round off the corners, this was all the easy work, now for the hard work because we were not allowed to use any designer patterned papers, so I had to choose my backing carefully, once i had made my choice I then cut them all out to the size I required with each one being smaller than the other, I then used my corner punch to round of the corners, I then stuck it all down onto a blank 8x8 card, the colours I went for really fit well with the rest of the decoration which is die cut vines in purple and blacks two die cut butterflies one in purple the other in black and then to finish it off I added two fabric roses and diamantés into the centre of the swirls on the vines

So I would like to enter this into the No Patterned Paper challenge

Kelly
xx

Completed Customer Orders

Hello all, well today has been a bit of a hectic one, firstly yesterday the better half realised that we needed to get a new suspension arm for the car, which i was not best pleased about at all but it needed to be done, so I was worrying myself over it so today we have been busy ringing around and finally managed to get one so after food shopping the other half went to collect it and then began replacing it so while he was out I got my self busy with some orders.

The first order I completed was a Present Day card, which was my first ever one to do as I had never been asked to do one before, Present Day is a day Jehovahs Witness' do instead of Christmas and Birthdays so it was lovely to be asked to do this sort of card as I had never had such a request before.

I had all the details off the customer of what he wanted on the card including being sent a picture to go on the front and what sentiment he wanted also what to put on the inside so all that was left for me to do was to put my finishing touches to it. So here we are

The front of the card

I started by getting a blank 8x8 card, then it was time to decide on what sort of background to use for such a card, so I went with a lovely glitter star background, I cut this down to size to fit the card, then I chose my next backing paper which was a pale blue with swirls, again i cut this smaller that the first layer, then I chose my last layer which is a stunning glitter purple backing card, again I cut this smaller than the last layer. So now I had my layers which I then used a corner punch to round off the edges as it gives it a better finish, once this was done I then printed out the picture to the size I wanted along with the sentiment, I then cut these out using a guillotine, after I used Tim Holtz distressing ink on the sentiment.

Now it was time to design how I wanted to lay it all out, once this was done I then glued each backing paper down, then used square sticky tabs on the picture and the sentiment, and stuck them to the card in the position I wanted, so now I had my backing papers done, picture and sentiment, now it needed that wow factor, so I used some die cuts which were given to me, positioned them and then glued them down, I then added two butterflies one in the corner of the picture and the other on the purple die cut. I then took some paper roses which I purchased from Wild Orchid Crafts, and glued them into position. Last but not least i then added some Candi dots too opposite corners of the picture. The front was not complete :)

The inside of the card

Now for the inside of the card, I firstly typed out in Microsoft word what the customer wanted, and then printed it onto good quality card, I then got two more of my lovely die cuts and positioned them into place and glued it all down, Finally I then added some lovely clear diamantés  to each corner of what the customer wanted, and again to each end of the swirls on the die cuts.

The second order I have worked on today is a novelty bank note for a customer who ordered this to be done for her daughters birthday.

Front of the bank note 

I designed all of this on a programme I have, the customer sent me the picture of her daughter that she wanted on the bank note, so all I had to do was my magic on the programme I have, once the front was done I then did the back


Once it was all complete I then resized it all and then printed it off onto good quality photo paper, once it had printed I then cut it all out, again used my corner punch to round off the corners, I then put the front and back together and lastly laminated it, cut that out and rounded off the corners with my corner punch


So as you can all see it has been a busy hectic day and my fibro has not been behaving today so had that to contend with aswell.

Kelly xxx


Website

Hello all well i haven't been able to do much crafting last few days due to ill health but i have been busy building my website and it is coming along brilliant, it should be up and running very soon. So i hope you all come and take a look once i announce its launched :-). I have a few orders to work on over the next few days so i will be busy doing them so stay tuned for a look at orders i have completed and the launch of the website.
Kelly xx

Saturday 2 February 2013

Memorial Bookatrix for a Special Angel Baby

Hello all, well today has been a crafting day I have been wanting to do this special project for a few weeks now since a friend of mine told me about Emily so I had to take a look at the page set up by her mum and dad on Facebook called Emily's Star, it melted my heart I could never imagine what it is like to go through loosing a child. 

So I wanted to do something special for Emily's mum and dad they had no idea that I was going to make this until today when I messaged them explaining and included a picture of what I had done. So here it is


Emily was born on 22/2/12 unfortunately Emily was born with Trisomy 18 also known as Edwards Syndrome, a syndrome that was not compatible with life and Emily's parents had been advised that Emily may only last for 4 days, but Emily survived for 26 days and then sadly grew her angel wings and passed away. Emily also has a star named after her hence the name of the Facebook page.

The page was set up to make people more aware of Trisomy 18 and to raise funds for the Children with Complex Needs Nurses and families across the UK.
You can find out more by going to either the Facebook Page
or by visiting the website

So please take a moment to take a look at the facebook page even give them a "Like" and help to spread the word

Friday 1 February 2013

My guardians

Hello all, well today has not been a crafting day at all, I got everything together that I wanted to do a special project but my printer was not behaving and took me a good 3 hours to sort it and finally print off what I needed, so tomorrow it will come to life now.

Anyway I thought I would introduce you to my little guardians
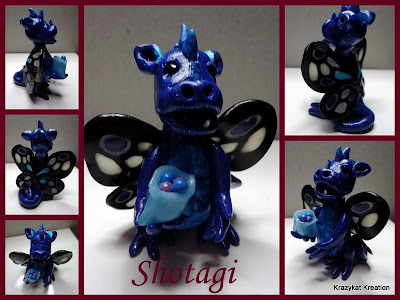
My adorable dragons all hand made from Polymer Clay by Donna Craig over at The Dragon Sanctuary on Facebook

Firstly i would like to introduce you to

Amuleth

Amuleth comes with her very own Adoption Certificate and Story 
here is her story 

I first adopted Amuleth when I made jewellery hence her story she was made to my specifications I choose her colours and mentioned I would like her to have something about beading, and this is what Donna did

Now my next dragon I adopted from The Dragon Sanctuary is 

Shotagi 

Shotagi is Amuleths brother and here is his story


After Shotagi along came my third little darling

Juna

Here is Juna's Story 


I then decided I would love another little dragon for my dragon family
and here he is 

Namirith

This is Namirith's Story

After a while i had an idea of one more dragon for my little family of dragons, but this one had to be very special with a magical friend that is never seen with dragons and he is one of a kind and his friend is a one off

Raiden and Sayuri

And here is there wonderful story 

As you can see from just the little collection I have these little guys are absolutely adorable
All of Donna's dragons are hand made by her and are made with alot of love and care they all come with their own story and adoption certificate, Donna makes these little guys to order and has come along way from when she first started to make these more and more have been adopted and created you should defo take a look at her work 


And I am sure I will be having a few more of these adorable dragons

Kelly xx


Wedding Invitations/Favour Boxes

Hello all again, I thought I would share another order I completed 

Now this order come in from a customer who I had previously done  50 Wedding Favour Boxes for which were Horse and Carriages with lovely Cadbury Purple and Lilac Butterflies on, so I already knew the lovely lady's colour scheme for her Wedding, and here is a picture of them for you to look at, and i am pleased to say she was over the moon with

Cadbury Purple and Lilac Butterfly Horse and Carriage Favour Boxes

So when she came back to me i was over the moon also, anyway she has asked me if it would be possible for me to make her invitations which she had done by somebody else look better as they were very plain, so I happily accepted challenge.

This is how they looked when the customer had sent them to me before I did anything to them ( i have removed personal details for obvious reasons)

So now the challenge had to begin, so I had all 50 invitations knew her colours and that was it as the customer trusted me to do her proud and gave me free reign on them, so i thought of incorporating the two colours of her scheme into the invitations but how was the questions??
Now they were originally supposed to be scroll style invitations so they came with lilac organza ribbon, so I knew I could bring that into them.

Now the magic has begun

As you can see i finally managed to come up with an idea, so I backed all the invitations onto good quality 300gsm Cadbury Purple card, I then added another butterfly again in Cadbury Purple, and finally the Lilac organza ribbon down the side, but i thought no something is missing as i know this lady likes her bling sooooooo.

The finished Product :)

Now after looking at the previous stage of the invitations for a while and knowing it needed that something extra, I added a lovely Cadbury Purple bow onto the Lilac organza ribbon also gorgeous Cadbury Purple Heart Diamanté's on to either side of the bow and again in the middle of the two punched intertwined hearts in the bottom right hand corner. 

I was so pleased with how they looked now they were all decorated, during the process i kept the customer up to date with everything I had in mind and was intending on doing to the Invitations, she was more than happy with my ideas, so to be able to send her a picture of them one of before and one of the finished product once, I was very excited along with nervous. When the customer come back to me to say how over the moon she was with them and that they looked so much better I had a big sigh of relief, she also stated she LOVED THEM!!!

This sort of response is what I love to hear and it always makes all the hard work worth while, and I hope she has a wonderful wedding day as she deserves it.

Thank You Sharon for asking me to be apart of what is going to be a wonderful day for both you and your husband to be
xxxx

Christening Invitations


The front of the Invitations


Now the front of the invitation includes hand stamped baby feet, the wording Christening Invitation is also hand stamped, and then we have the gorgeous Teddy Bo & Co digi stamp which I also hand coloured using Promarkers the colours i used were Tan,Satin,Cool Aqua, Cornflower and Sky Blue, now bare in mind the customer wanted 25 of these so all 25 were done by hand every single stamp every single digi stamp was coloured and i enjoyed every minute of it. I also used Tim Holtz distress ink on the edges of the digi stamp topper and added clear diamanté's

Front and Inside Invitations

This is the front of the invitations and the inside, the inside was all done on my computer and printed, I then again hand stamped a baby foot print just to give it that special finish.

Once these were completed I messaged the customer and also uploaded a photo for her to see them all finished, and her reaction to them was next to none she was so pleased with them and over the moon, it definately made all the hard work worth while :)


I would also like to enter the above into the Teddy Bo & Co Anything Goes Challenge


First Blog

Hello and Welcome to Kelly's Card Creations Official Blog

Hi all, well this is my first ever blog so please bare with me as i get to grips with everything, on here i hope to share with you all some of my creations sneek peeks and anything else crafty.

I have seen so many people who i know with blogs and thought i better get upto date and get blogging about what i do on a day to day basis when i have time to craft, and not in pain from my Fibromyalgia, the first thing i am going to blog about is an order i have recently completed 


so watch this space!!!